Embroidery, an age-old art form, hinges on the fine detail and precision of its tools. The foundation of this intricate craft lies in one seemingly simple yet crucial step: threading the needle. This initial process sets the stage for a rewarding and successful embroidery experience.
The Importance of Proper Threading
- Accuracy: Proper threading ensures that stitches are even and precise, which is vital for the overall quality of the embroidery.
- Efficiency: Correctly threaded needles make the process smoother and faster, reducing frustration and time wasted on untangling threads.
- Longevity of Materials: Good threading techniques prevent damage to both the thread and the needle, thereby extending their usability.
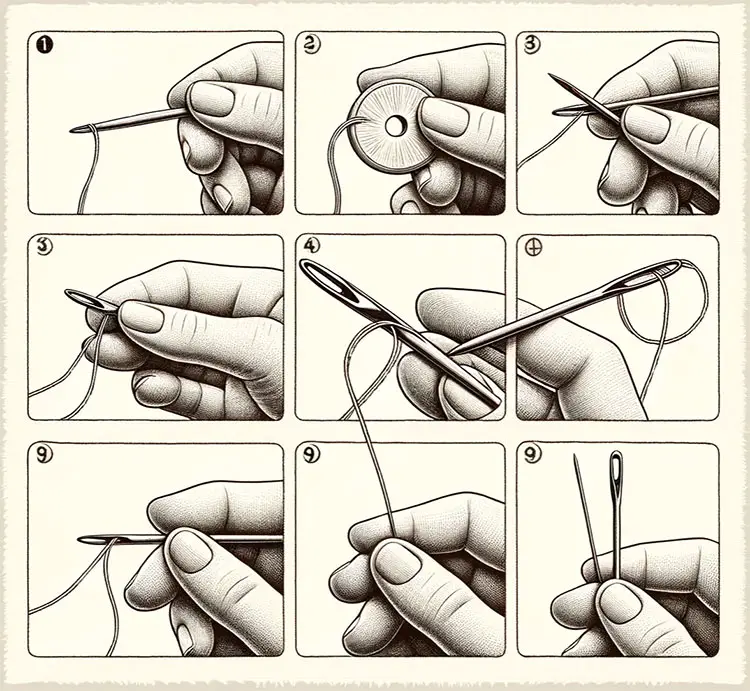
Step-by-Step Guide on How to Thread an Embroidery Needle
1. Preparing the Thread End:
- Cut the thread cleanly with sharp scissors to create a neat end.
- If the thread is frayed, trim it to ensure a smooth tip.
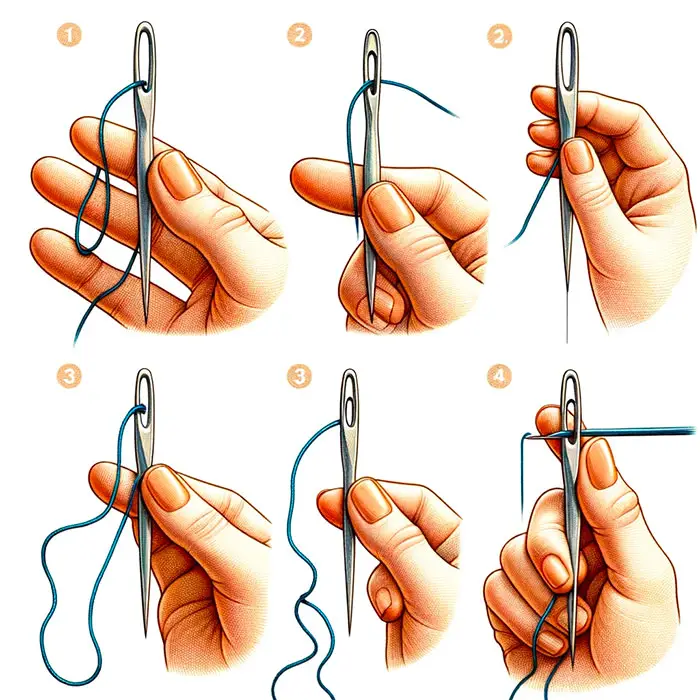
2. Holding the Needle:
- Hold the needle between your thumb and forefinger, with the eye facing you.
3. Threading the Needle:
- Moisten the end of the thread slightly with your lips or fingers to compact it, making it easier to pass through the needle’s eye.
- Bring the thread to the needle (not the needle to the thread) and carefully insert the thread through the eye.
- Pull approximately 3 to 6 inches of thread through the eye.
4. Securing the Thread:
- If your embroidery technique requires it, knot the end of the thread.
Tips for Threading the Needle with Multiple Strands of Thread
- Separating the Strands: If using embroidery floss, separate the strands first and then recombine the required number. This prevents twisting and ensures even coverage.
- Threading One Strand at a Time: It can be easier to thread one strand through the needle and then add additional strands one by one.
- Equalizing the Thread Lengths: After threading, ensure all strands are of equal length for uniform stitching.
Using a Needle Threader for Easier Threading
1. How to Use a Needle Threader:
- Insert the wire loop of the threader through the needle’s eye.
- Pass the thread through the wire loop.
- Gently pull the threader back through the needle’s eye, bringing the thread with it.
2. Benefits of Using a Needle Threader:
- Convenience: Especially useful for those with unsteady hands or difficulty seeing the needle’s eye.
- Multiple Strands: Simplifies the process of threading multiple strands.
- Time-Saving: Great for projects requiring frequent thread changes.
3. Selecting the Right Threader:
- Choose a needle threader that matches the size of your needle’s eye, as threaders come in various sizes.
Incorporating these techniques into your embroidery practice can make threading the needle a quick, simple, and frustration-free step, allowing you to focus more on the creative aspects of your project.
Choosing the Right Needle and Thread
Embroidery’s beauty and intricacy are greatly influenced by the choice of needle and thread. These elements work in tandem, and their compatibility is crucial for the ease of stitching and the quality of the final product.
The Importance of the Right Needle Size
Matching Needle to Thread:
The size of the needle’s eye and its shaft should correspond to the thickness of the thread. A mismatch can lead to several issues:
- Too Small Needle: Struggles in threading, thread damage, and uneven stitches.
- Too Large Needle: Unnecessary puncture size in the fabric, leading to a less neat finish.
Needle Types:
Different types of embroidery, like cross-stitch or crewel work, require specific needle types, such as:
- Tapestry Needles: Blunt tip, ideal for cross-stitch.
- Crewel Needles: Sharp tip, suitable for crewel embroidery.
Tips for Choosing the Right Embroidery Thread
1. Thread Material:
- Cotton: Popular for its sheen and strength; ideal for most embroidery.
- Silk: Offers a luxurious sheen; best for high-end, delicate work.
- Rayon: Vibrant and shiny but less durable than cotton.
- Polyester: Strong and colorfast; a good alternative to rayon.
2. Thread Weight:
- The weight of the thread affects its thickness.
- Heavier threads (lower number) give bolder, more pronounced stitches.
- Lighter threads (higher number) are finer, for delicate, detailed work.
3. Specialty Threads:
- Consider metallic, variegated, or glow-in-the-dark threads for special effects.
4. Thread Quality:
- Opt for higher-quality threads to ensure colorfastness and durability.
- Avoid overly cheap threads, which may break easily or fade quickly.
5. Color Selection:
- Choose colors according to your design’s needs.
- Be mindful of colorfastness, especially for items that will be washed frequently.
By carefully selecting the appropriate needle and thread, embroiderers can ensure a smoother process and a more exquisite final product. The right tools not only make the task more enjoyable but also elevate the quality of the embroidery, showcasing the skill and effort put into each stitch.
Measuring the Thread for Embroidery
The length of the thread used in embroidery is a critical factor that can affect both the ease of stitching and the quality of the finished work. Measuring and cutting the thread to the right length is an essential skill in embroidery, ensuring efficiency and minimizing issues such as tangling and knotting.
How to Measure the Right Length of Thread
1. Determining the Length:
- Standard Length: Generally, a length of 18 to 24 inches (about 45 to 60 cm) is recommended. This length is long enough for substantial stitching but short enough to prevent tangling and wearing of the thread.
- Adjust Based on Experience: As you become more familiar with embroidery, you may adjust the length to suit your comfort level.
2. Measuring Technique:
- Use a Ruler or Measuring Tape: For precision, especially important for beginners.
- Use Your Own Measurements: Some experienced embroiderers use their own body for quick measurements, such as the distance from hand to shoulder.
Tips for Cutting the Thread to the Right Length
1. Sharp Scissors:
- Always use sharp embroidery scissors for a clean cut. Dull scissors can fray the thread, making it harder to thread the needle.
2. Avoiding Excessively Long Threads:
- Resist the temptation to use overly long threads to reduce the frequency of re-threading. Long threads are prone to tangling and can become worn as they are repeatedly pulled through the fabric.
3. Consider the Type of Thread:
- Different threads may require different handling. For example, stranded cotton can be separated into thinner strands, whereas wool or specialty threads might have specific length requirements based on their texture and use.
4. Factor in the Embroidery Technique:
- Some techniques or stitches may consume more thread and thus require slightly longer lengths.
5. Account for Learning Curve:
- Beginners should start with shorter lengths to manage the thread more easily, gradually increasing as they gain more control and experience.
Properly measuring and cutting the embroidery thread is not just about the length; it’s about ensuring a comfortable and efficient stitching process. This attention to detail at the very beginning sets the tone for the entire embroidery project, leading to a more enjoyable experience and a beautiful end result.
Knotting the Thread
After successfully threading the needle, the next crucial step in embroidery is knotting the thread. A well-tied knot prevents the thread from slipping through the fabric while embroidering, ensuring that your stitches stay in place.
How to Knot the Thread After Threading the Needle
1. Understanding When to Knot:
- Knotting is suitable for certain types of embroidery where the back of the work is not visible.
- For techniques requiring a smooth back, like in clothing, knots may be avoided.
2. Choosing the Right Knot:
- A simple overhand knot is often sufficient for most embroidery projects.
Step-by-Step Guide on Creating a Secure Knot
Step 1: Making the Knot
- Hold the threaded needle in one hand and the loose end of the thread in the other.
- Wrap the loose end around your finger, creating a loop.
Step 2: Twisting the Thread
- Roll the looped thread between your thumb and finger, which will create a twist in the thread.
Step 3: Pulling the Knot
- Slide the twisted thread off your finger, maintaining the loop.
- Hold the twist between your thumb and finger, and gently pull the needle and the rest of the thread through the loop.
Step 4: Securing the Knot
- Continue pulling until the knot reaches the end of the thread and tightens. Be careful not to pull too hard, as this might cause the thread to break.
Step 5: Positioning the Knot
- Slide the knot down to your desired position near the end of the thread. This can be adjusted based on how long you need the tail to be.
Additional Tips for Knotting
- Knot Size: Ensure the knot is large enough not to pull through the fabric but not too large to cause a bump or distortion.
- Double Knots: For thinner threads, a double knot might be necessary for added security.
- Avoiding Bulk: For finer embroidery, consider other methods like weaving the thread end through the back of your stitches instead of knotting to avoid bulk.
- Practicing Consistency: Consistent knot size and placement can help maintain even tension throughout your work.
By mastering the art of knotting embroidery thread, you ensure that each stitch is anchored securely, contributing to the durability and beauty of your embroidered piece.
Conclusion
Threading an embroidery needle is a fundamental skill in the craft of embroidery, serving as the gateway to creating beautiful, intricate designs. Let’s recap the key steps and offer some final words of encouragement.
Recap of the Steps for Threading an Embroidery Needle
- Choosing the Right Needle and Thread: Select a needle and thread that are compatible in size and suitable for your project.
- Measuring the Thread: Cut your thread to a manageable length, generally 18 to 24 inches, to prevent tangling.
- Threading the Needle: Prepare the thread end, hold the needle correctly, and carefully thread the eye, using a threader if necessary.
- Knotting the Thread: Tie a secure knot at the end of your thread, if required by your embroidery technique, to prevent slipping through the fabric.
Each of these steps, while simple in their individual execution, collectively form the foundation of successful embroidery work. As with any craft, proficiency in threading an embroidery needle comes with practice and patience.
Encouragement for Practice and Patience
Embroidery, like any art form, requires time and dedication to master. Each step, from selecting your materials to threading and knotting, plays a crucial role in the overall process. It’s important to remember that every expert was once a beginner, and every intricate piece of embroidery started with a single threaded needle.
Tips for Continued Practice:
- Start Small: Begin with simple projects to build your confidence.
- Experiment: Try different types of needles, threads, and fabrics to understand their behaviors.
- Learn from Mistakes: Each error is an opportunity to improve your technique.
- Seek Resources: Utilize tutorials, books, and community advice to expand your skills.
- Enjoy the Process: Remember that embroidery is not just about the end product but also the joy of creating.
Embroidery is a journey of patience, creativity, and continuous learning. The satisfaction of seeing your designs come to life is well worth the effort invested in mastering these basic skills. So, thread your needle with confidence and embark on the rewarding path of embroidery.





Leave a Reply