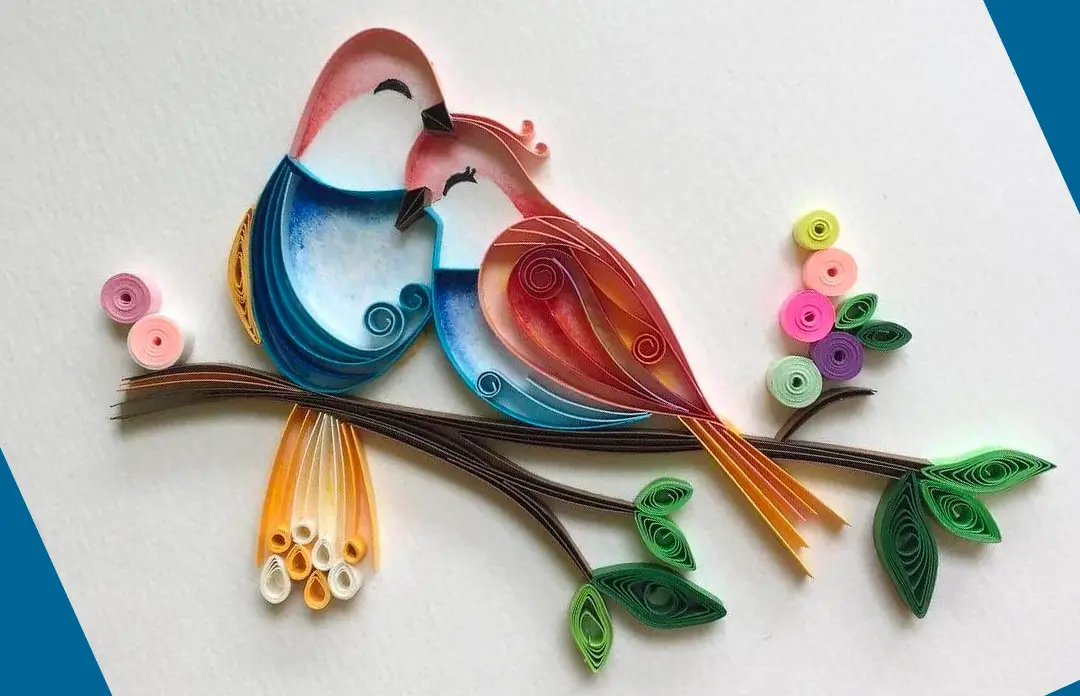
Welcome to the fascinating world of paper quilling, a delightful form of art that turns simple paper strips into intricate and impressive designs. But what exactly is paper quilling? In essence, paper quilling involves rolling, shaping, and gluing strips of paper to create beautiful, three-dimensional artwork. From delicate flowers to ornate portraits and abstract designs, the creative possibilities with paper quilling are virtually limitless.
Paper quilling, also known as paper filigree, has a rich and interesting history. Its origins can be traced back to the Renaissance period, when French and Italian nuns and monks used gold-edged paper remnants to decorate religious artifacts. They started rolling these paper strips around the quill of a bird’s feather – hence the name ‘quilling’.
Over time, the art of paper quilling spread throughout Europe and later to the Americas. During the 18th and 19th centuries, it was even taught to young women in England as a ‘proper’ artistic endeavor. Today, paper quilling is cherished around the world as an accessible and rewarding craft, appreciated for its simplicity, cost-effectiveness, and the exquisite results one can achieve with a little practice and patience.
In the sections that follow, we will delve deeper into the intricacies of paper quilling, exploring its techniques, styles, and why you might want to try your hand at this captivating art form.
What is Paper Quilling
Paper quilling is a meticulous craft that involves rolling, looping, curling, and twisting thin strips of paper into various shapes. These shapes, such as circles, teardrops, squares, or even intricate spirals, are then arranged and glued onto a backing material to form artistic designs. The beauty of paper quilling lies in its flexibility – you can create anything from a simple heart-shaped pendant to a detailed landscape.
Materials and Tools for Paper Quilling
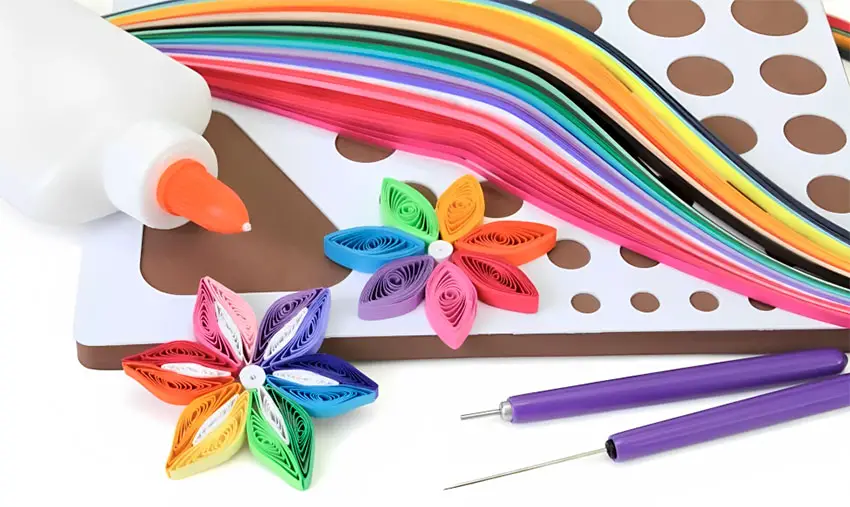
Entering the realm of paper quilling doesn’t require a vast or expensive array of tools. Here are the essentials:
- Quilling Paper Strips: These are the heart of your artwork. They come in various widths and a rainbow of colors, allowing you to create diverse and vibrant designs.
- Slotted Quilling Tool: This is used to roll the paper strips into coils. The slot at the tip makes it easier to hold the paper while rolling.
- Glue: A good quality craft glue is used to secure the paper coils. It’s best to opt for something that dries clear.
- Tweezers: Tweezers can help in handling and positioning the smaller, more delicate quilled shapes.
- Quilling Board or Workboard: This tool has various-sized holes to help shape and size the coils uniformly.
With these basic tools and materials, you’re well on your way to starting your journey in paper quilling. In the next section, we’ll walk through the basic process and techniques used in this captivating art form.
The Process of Paper Quilling
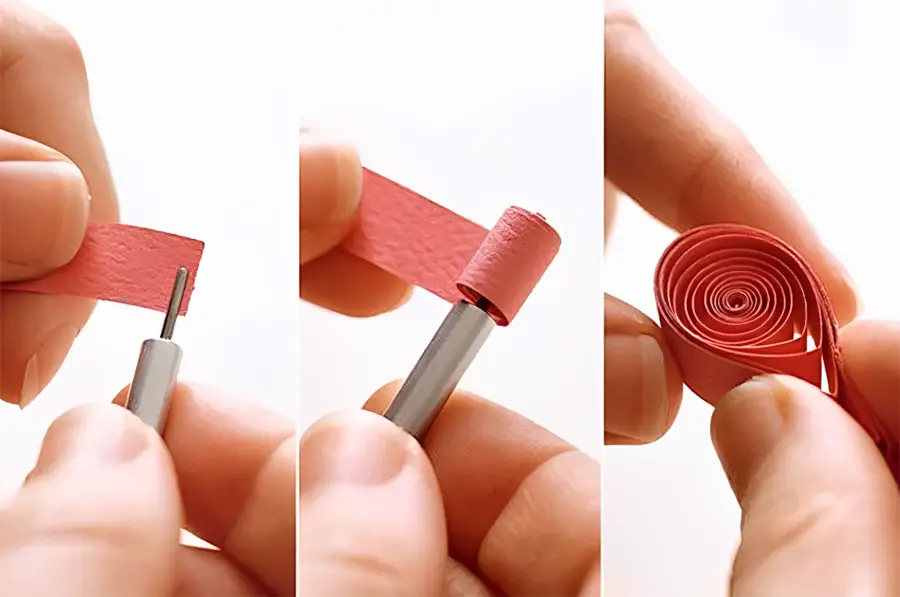
Starting with paper quilling might seem daunting, but once you understand the basics, it’s a breeze. Here’s a simplified guide to kickstart your paper quilling journey:
- Choose Your Paper: Start by selecting your quilling paper strips. They come in a variety of colors and widths, so pick those that best suit your project.
- Roll the Paper: Insert one end of the paper strip into the slot of your quilling tool and start rolling towards the other end.
- Shape the Coil: Once you’ve rolled the paper strip completely, you can remove it from the tool. Allow the coil to relax and form into a loose circle.
- Secure the End: Apply a small amount of glue to the end of the strip to secure the coil.
- Shape the Quilled Coil: Depending on your design, you can pinch, stretch, or curve the coil to form different shapes.
Basic Shapes and Techniques in Paper Quilling
In paper quilling, you start with a basic coil and then manipulate it to create various shapes. Here are some common ones:
- Loose Coil: This is the simplest form where the coiled paper is allowed to relax before gluing the end.
- Teardrop: Pinch one side of the loose coil to create a teardrop shape.
- Marquise or Eye: Pinch both sides of the loose coil to form an eye shape.
- Heart: Pinch a marquise shape at both ends to form a heart.
- Square or Rectangle: Manipulate a loose coil by pinching it into squares or rectangles.
Understanding these basic shapes will provide a strong foundation for your paper quilling projects. Let’s move on to explore the various styles and applications of this craft.
Varieties and Styles
Paper quilling is not a one-size-fits-all craft. Its versatility allows for a range of styles and techniques, each adding a unique twist to your creations. Here are a few popular styles:
- Eccentric Quilling: This style involves creating coils that aren’t perfectly round, giving your designs an eccentric and abstract look.
- 3D Quilling: Instead of laying the quilled pieces flat, 3D quilling involves shaping and joining the quilled pieces into three-dimensional objects like animals, flowers, or even miniature buildings.
- Crimping: Crimping is a technique where the paper strips are passed through a crimping tool to create a corrugated effect before quilling.
- Quilled Typography: This style involves shaping quilled paper to form letters and words, perfect for personalized cards and wall art.
Applying Styles to Projects
These varied styles can be employed in a multitude of projects. Eccentric quilling can add a touch of whimsy to greeting cards or bookmarks. 3D quilling can be used to create intricate jewelry pieces or stand-alone sculptures. Crimping can add texture to flowers or background elements in a framed quilled piece. Quilled typography, on the other hand, is great for creating personalized home decor or gifts.
By mastering these different styles and techniques, you can expand the scope of your paper quilling projects and create truly unique pieces of art. Next, we’ll discuss why paper quilling is a craft worth exploring.
Why Try Paper Quilling?
If you’re still contemplating whether to dive into the world of paper quilling, here are some compelling reasons that might tip the scale:
- Creativity Unleashed: Paper quilling allows you to express your creativity in countless ways. With a few basic shapes, you can compose intricate designs that are truly your own.
- Accessibility: Paper quilling is an accessible craft that doesn’t require expensive materials or a dedicated workspace. All you need are some basic tools, a bit of glue, and your imagination.
- Relaxation: Many enthusiasts find the process of paper quilling to be meditative and calming. The act of rolling and shaping the paper can help to focus the mind and ease stress.
- Achievement: There’s a great sense of accomplishment in transforming simple strips of paper into a beautiful, tangible artwork.
Paper Quilling as a Creative Outlet
In our fast-paced world, paper quilling offers a rare opportunity to slow down, relax, and engage with the tactile pleasures of crafting. It provides a break from digital screens and allows for a deeper connection with our creative selves. Whether you’re making a gift for a loved one or a piece of decor for your home, the process of creating something beautiful and intricate from simple materials can be deeply satisfying.
In the next section, we’ll provide some helpful tips and resources to get you started on your paper quilling journey.
Getting Started with Paper Quilling
Venturing into paper quilling is exciting, and to help you along, here are some beginner-friendly tips:
- Start Simple: Master the basic shapes first before moving onto more complex designs.
- Quality Materials: Invest in good quality paper and glue. They make a big difference in the final appearance of your work.
- Practice Patience: Remember, paper quilling is a craft of precision and patience. Don’t rush your work.
- Experiment: Don’t be afraid to try out different techniques, shapes, and colors. It’s all part of the learning process.
Resources for Learning
When it comes to learning paper quilling, there are ample resources available. Here are a few recommendations:
- Books: “The Art of Paper Quilling” by Claire Sun-ok Choi is an excellent guide for beginners. Another good read is “Quilled Mandalas” by Alli Bartkowski.
- Online Tutorials: Websites like YouTube have countless video tutorials for paper quilling. Channels such as “Quilling Guru” offer step-by-step guides for various projects.
- Online Courses: Websites like Udemy or Skillshare offer comprehensive courses on paper quilling, often taught by experienced quillers.
- Communities: Join online communities, forums, or social media groups dedicated to paper quilling. They can provide inspiration, tips, and support as you learn.
Remember, every expert was once a beginner. With practice and patience, you’ll soon create beautiful quilled artwork of your own.
FAQ
Now that we’ve covered the basics of paper quilling, you may have some specific questions. In this Frequently Asked Questions (FAQ) section, we aim to address those queries that often arise among newcomers to this craft. These are questions that may not have been directly covered in the main body of the article, but are nonetheless important to provide a more holistic understanding of paper quilling.
What type of paper is best for quilling?
The best type of paper for quilling is typically lightweight, about 80-120 GSM. It should be flexible enough to be rolled easily, yet sturdy enough to hold its shape. Quilling paper strips, available in craft stores and online, come in a variety of colors and sizes, which are ideal for this craft.
Can I quill with other materials besides paper?
While paper is the most common material for quilling, you can certainly experiment with other materials. Thin strips of flexible plastic, metallic foil, or fabric can be used. However, these materials may require different handling and adhesive techniques compared to paper.
How can I prevent my quilled designs from unrolling?
To prevent your quilled designs from unrolling, a small amount of craft glue is used to secure the end of the paper strip once the desired shape is achieved. It’s also essential to give the glue adequate time to dry to ensure the shapes hold firm.
Is paper quilling safe for children?
Yes, paper quilling can be a safe and enjoyable craft for children, but adult supervision is recommended, especially when using tools like the quilling needle or scissors. For younger children, consider using a slotted quilling tool, which is safer and easier to handle.
How do I preserve my quilled artwork?
To preserve your quilled artwork, consider using a sealant or varnish that can be applied lightly over the finished piece. This not only helps to strengthen and protect the artwork but also helps to prevent damage from humidity or dust. It’s also a good idea to display or store your artwork away from direct sunlight to prevent color fading.
What is the ideal length of quilling strips?
The ideal length of quilling strips can vary depending on the project, but most commercial quilling strips come in lengths of about 17-21 inches. This length is generally easy to handle and versatile enough for various designs. For larger projects or specific designs, strips can be glued end-to-end to achieve the desired length.
How do I choose a quilling tool?
When choosing a quilling tool, consider the slotted and needle tools, the two main types available. Slotted tools are excellent for beginners because they make the process of rolling coils easier. Needle tools, while requiring more skill, create coils without the tiny crimp that slotted tools leave in the center. The choice depends on your comfort and the requirements of your project.
Can I make my own quilling paper?
Yes, you can make your own quilling paper by cutting strips from sheets of lightweight, flexible paper. This allows you to customize the length, width, and color according to your project. Ensure the cuts are uniform and straight for the best results.
What can I use instead of a quilling board?
If you don’t have a quilling board, a corkboard or foam board can serve as a good alternative. Pins can be used to hold the shapes in place as you work. Alternatively, you can create your own quilling board by drawing a grid of circles in different sizes on a piece of sturdy cardboard.
How long does it take to complete a quilling project?
The time to complete a quilling project depends on the complexity of the design and your skill level. A simple quilled greeting card might take a couple of hours, while a more intricate framed art piece could take days or even weeks. The key to quilling is patience, so it’s best not to rush the process.
Conclusion
In essence, paper quilling is an art form that transforms simple strips of paper into intricate, beautiful designs. This versatile craft has roots dating back to the Renaissance and continues to be cherished worldwide today. It’s a craft that anyone can pick up, requiring just a handful of affordable materials and tools – quilling paper strips, a slotted quilling tool, glue, tweezers, and a quilling board.
We’ve explored the process of paper quilling, starting from rolling your first paper coil to creating a variety of shapes like the loose coil, teardrop, marquise, heart, and square. The craft offers numerous styles and techniques such as eccentric quilling, 3D quilling, crimping, and quilled typography, each adding a unique flair to your projects.
Paper quilling can be a wonderful creative outlet, providing relaxation and a sense of accomplishment. For those keen to start, resources like books, online tutorials, courses, and communities can offer invaluable guidance and inspiration.
Remember, patience and practice are key. With time, you’ll be able to transform a simple strip of paper into a work of art. So, why not give paper quilling a try? You might just discover a new passion.
Resources
- Blake, J. (1976). The Delicate Art of Quilling. Design, 77(3), 8-10.
- Johnston, M. (1998). Paper Quilling: Beautiful Paper Filigree to Make in a Weekend. Lark Books.



Leave a Reply