Have you ever wondered how to create a stunning and realistic fist drawing? Look no further! In this comprehensive guide, we will dive into the captivating art of fist drawing and explore the importance of understanding hand anatomy for artists. By learning how to draw a fist, you’ll not only enhance your artistic skillset, but you’ll also gain a deeper appreciation for the intricate details of the human hand. Get ready to follow our step-by-step guide that will lead you through the process of creating an impressive fist drawing that you’ll be proud to show off.
Understanding Hand Anatomy for Fist Drawing
Before we dive into the actual process of drawing a fist, it’s essential to have a solid understanding of the hand’s underlying anatomy. This knowledge is crucial for creating realistic and accurate fist drawings that capture the essence of human expression.
The basic structure of a hand consists of bones, joints, and muscles. There are 27 bones in each hand, including the wrist bones (carpals), the palm bones (metacarpals), and the finger bones (phalanges). The joints, which are the points where bones meet, allow the fingers to bend and perform various movements. The muscles, tendons, and ligaments in the hand help control these movements and maintain the hand’s strength and stability.
A thorough understanding of hand anatomy is vital for any artist who wants to create realistic and expressive fist drawings. By studying the bones, joints, and muscles, you will learn how the hand’s components interact with each other, which will enable you to accurately represent a clenched fist in your drawings. This foundation in hand anatomy will not only improve your ability to draw fists but will also elevate your overall skill in capturing the human form in your artwork.
Gathering Materials and Tools
Before beginning your fist drawing journey, it’s important to gather the necessary materials and tools to ensure the best possible outcome. The right materials can make all the difference in the quality and appearance of your finished artwork. Here is a list of recommended drawing tools to get you started:
- Pencils: A variety of pencils with different hardness levels (HB, 2B, 4B, etc.) will allow you to create a range of lines and shading effects. A mechanical pencil can also be useful for finer details.
- Erasers: A kneaded eraser is excellent for lifting graphite and making subtle adjustments, while a regular white eraser is useful for completely erasing mistakes.
- Paper: Choose a high-quality drawing paper with a smooth surface that suits your preferred medium, whether it’s graphite, charcoal, or colored pencils.
- Blending tools: Blending stumps or tortillons are helpful for smoothing out shading and creating soft transitions between tones.
- Ruler or straightedge: This can be useful for creating accurate proportions and measuring angles.
- Pencil sharpener: Keep your pencils sharp for precise lines and details.
Choosing the right materials for your fist drawing is essential, as it impacts the overall quality and appearance of your finished piece. High-quality tools and materials enable you to achieve the desired outcome, while inferior materials can hinder your progress and limit your ability to capture the intricacies of the human hand. By investing in the right tools, you are setting yourself up for success and ensuring that your artwork truly reflects your skill and dedication.
How To Draw a Fist Step-by-Step Guide
Step 1: Sketch the Basic Shape
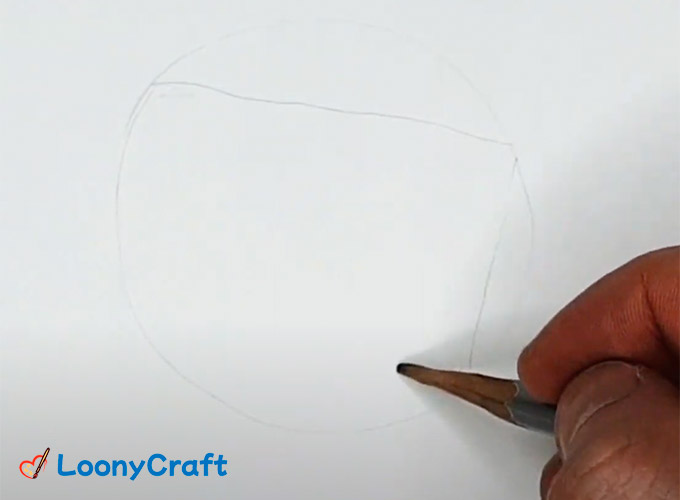
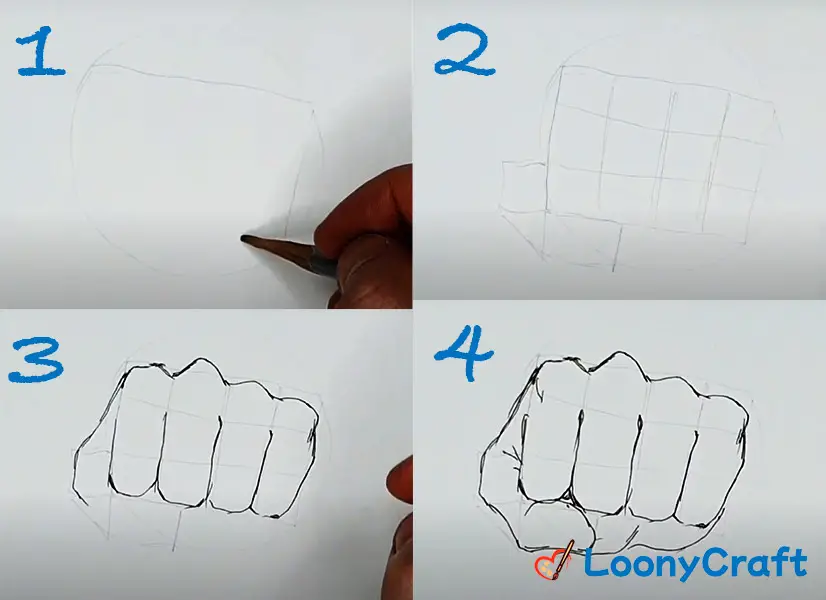
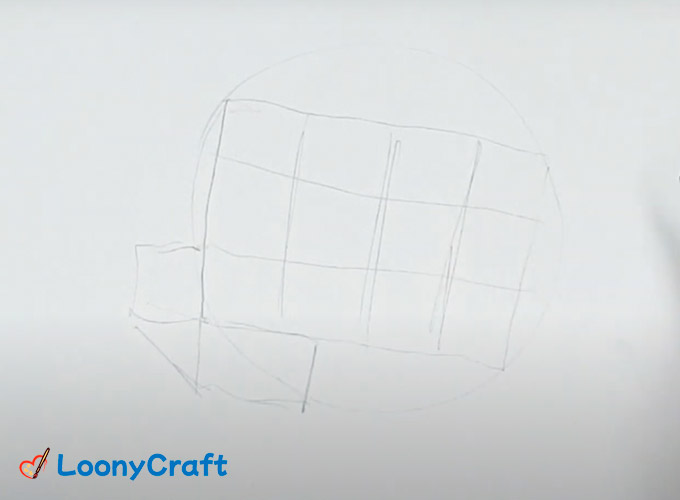
To begin drawing a fist, start by sketching a simple, rounded rectangular shape that represents the palm of the hand. This will serve as the base for the rest of your drawing. Keep your lines light and loose, as you will refine the details later.
Step 2: Add Details to the Fingers
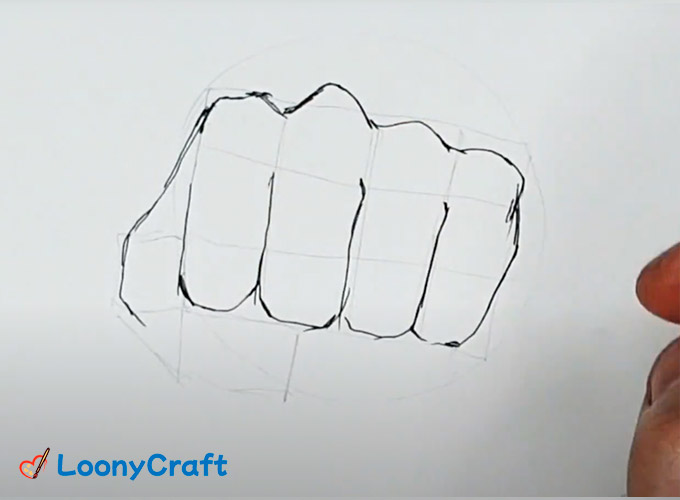
Next, sketch the fingers by drawing four slightly curved, cylindrical shapes stacked on top of the palm. The fingers should be of varying lengths, with the middle finger being the longest and the pinky finger the shortest. Pay attention to the natural bend of the fingers in a clenched fist, and make sure the fingers slightly overlap each other.
Step 3: Define the Thumb
Now, draw the thumb on the side of the hand, partially covering the index finger. The thumb should be shorter than the other fingers and have a more rounded appearance. Remember that the thumb’s position will depend on the angle and perspective of the fist in your drawing.
Step 4: Refine the Knuckles
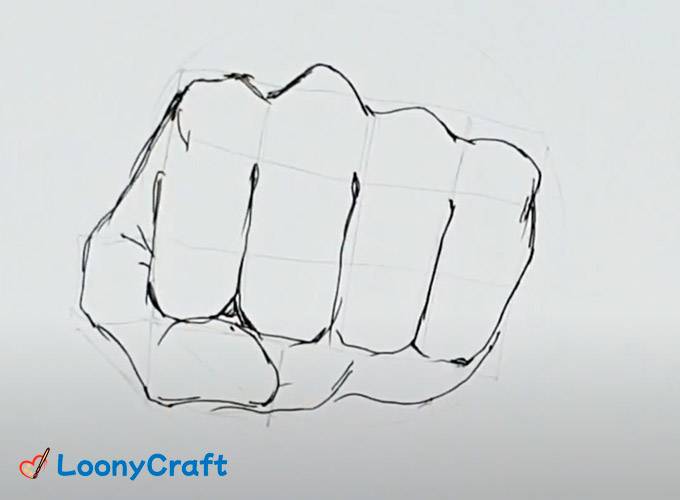
At this stage, refine the knuckles by adding small, rounded shapes along the line where the fingers meet the palm. Keep in mind that knuckles vary in size, with the middle knuckle being the most prominent. Add creases and lines to emphasize the folding of the skin around the knuckles and the tension in the clenched hand.
Step 5: Add Shadows and Highlights
Finally, create depth in your fist drawing by adding shadows and highlights. Observe the light source in your reference or imagine one, and apply shading to the areas where shadows naturally occur, such as under the fingers and around the knuckles. Use a blending tool to create smooth transitions between the shaded areas and the lighter ones. Add highlights to the areas where light hits the knuckles and fingers to give your drawing a more three-dimensional appearance.
By following these steps, you’ll be well on your way to creating a realistic and expressive fist drawing. Remember to practice and experiment with different perspectives and lighting to further enhance your skills.
Tips for Drawing a Fist from Different Angles
Mastering the art of drawing a fist involves more than just understanding hand anatomy and perfecting your technique; it also requires the ability to depict fists from various perspectives. By practicing drawing fists from different angles, you’ll become more versatile as an artist and gain a deeper understanding of the hand’s structure and movement.
Here are some tips for drawing fists from different angles:
- Use references: Collect or take photographs of hands and fists from various angles to use as reference material. Studying these images will help you understand the changes in appearance and proportion that occur with different perspectives.
- Break down the hand into simple shapes: Regardless of the angle, begin your drawing by breaking down the hand into its basic geometric shapes. This will help you establish the overall structure and proportions before you add the details.
- Practice foreshortening: Foreshortening is a technique used to create the illusion of depth and perspective in a drawing. When drawing a fist from an angle where some fingers or parts of the hand appear shorter due to perspective, remember to adjust their length and size accordingly.
- Observe the position of the thumb: The thumb’s position in relation to the fingers changes depending on the angle of the fist. Be mindful of the thumb’s placement and ensure that it appears accurate from the chosen perspective.
- Rotate your reference: If you’re working with a physical object or photograph as a reference, try rotating it to see the fist from various angles. This will help you understand how the hand’s structure changes with different perspectives.
- Practice gesture drawing: Gesture drawing is a quick and loose sketching technique that helps artists capture the essence of a subject. By practicing gesture drawing with fists, you can develop your ability to quickly and accurately depict the hand’s structure from different angles.
- Experiment with lighting: Different lighting conditions can dramatically change the appearance of a fist. Try drawing fists with various light sources and observe how shadows and highlights shift with the changing angles.
By consistently practicing drawing fists from different angles, you’ll become more adept at capturing the intricacies of the human hand and elevate your overall artistic abilities. Remember, the key to improvement is persistence and patience, so keep practicing and experimenting with various perspectives to hone your skills.
Common Mistakes and How to Avoid Them
Drawing fists can be challenging, and it’s not uncommon for artists to make mistakes along the way. Here are some common errors made while drawing fists and solutions for overcoming them:
- Incorrect proportions: One of the most common mistakes is drawing the fingers and thumb with incorrect proportions. To avoid this, study hand anatomy and use references to understand the relative lengths and sizes of each finger and the thumb.
- Overly rigid fingers: Another common error is drawing fingers that are too straight or rigid. Remember that fingers have a natural curve, even when clenched in a fist. Observe the curvature in your references and incorporate this into your drawing.
- Flat appearance: A lack of depth can make your fist drawing appear flat and unrealistic. To create the illusion of depth, use shading and highlights to emphasize the contours of the hand and show the overlapping of fingers and thumb.
- Ignoring the underlying structure: Neglecting to consider the hand’s bone and muscle structure can lead to an unrealistic fist drawing. Study hand anatomy and use it to inform your drawing, ensuring that the knuckles and other details align with the hand’s underlying structure.
- Inconsistent light source: Inconsistent shading and highlights can make your drawing appear disjointed. To avoid this, establish a clear light source and ensure that shadows and highlights are applied consistently throughout your drawing.
- Rushing the process: Taking shortcuts or rushing through the drawing process can lead to inaccuracies and a less polished final result. Be patient, take your time, and focus on capturing the nuances of the hand’s anatomy and movement.
- Not using references: Trying to draw a fist from memory can be difficult and may result in mistakes. Use reference images or photographs to guide your drawing and help you understand the hand’s anatomy and appearance from different angles.
By being aware of these common mistakes and employing the solutions provided, you’ll be better equipped to create more accurate and realistic fist drawings. Remember that practice is essential, and with time and effort, you’ll continue to improve your skills and overcome these challenges.
Conclusion
In conclusion, learning how to draw a fist is an essential skill for any artist seeking to create realistic and expressive hand drawings. Understanding hand anatomy, including the bones, joints, and muscles, is crucial for accurately capturing the intricacies of a clenched fist. By studying hand anatomy and practicing fist drawing from various angles, you’ll develop the ability to create lifelike and dynamic illustrations.
To improve your fist drawing skills, follow the step-by-step guide provided in this article, pay attention to common mistakes and how to avoid them, and practice drawing fists from different perspectives. Remember, the keys to mastering fist drawing are patience, persistence, and a willingness to learn from your mistakes.
By dedicating time and effort to honing your skills, you’ll soon be able to create impressive and realistic fist drawings that capture the essence of human emotion and movement. So grab your materials, study hand anatomy, and start practicing the art of fist drawing today!
FAQ
We understand that learning how to draw a fist can be a complex process, and you may have some lingering questions even after reading our comprehensive guide. In this FAQ section, we’ll address some common questions that readers might have, providing additional insights and tips to further support your fist drawing journey. Remember, mastering this skill takes time and practice, so don’t be discouraged if you still have questions – we’re here to help!
Here are some possible questions for the FAQ section that aren’t explicitly addressed in the main article:
How can I improve my hand drawing skills in general, not just for fists?
To improve your overall hand drawing skills, practice drawing hands in various poses and from different angles. Study hand anatomy, including bones, muscles, and skin folds, to create more accurate and lifelike drawings. Additionally, observe real hands or use reference images to better understand hand structure, proportions, and movement. Patience and consistent practice are key to improving your hand drawing skills.
What are some common hand poses that I should practice drawing alongside fists?
Some common hand poses to practice drawing alongside fists include relaxed open hands, hands holding objects, pointing fingers, hands in different gestures (e.g., thumbs up, peace sign, or waving), and hands interacting with other objects or surfaces. Practicing a variety of hand poses will help you develop versatility and a better understanding of hand movement and anatomy.
How can I make my fist drawings more expressive or convey different emotions?
To make your fist drawings more expressive, experiment with varying degrees of tension in the fingers and hand muscles, as well as the position and angle of the fist. Use shading and highlights to emphasize the mood and intensity of the fist. You can also consider incorporating other elements, such as facial expressions or body language, to create a more comprehensive depiction of the emotion you wish to convey.
Can you recommend any resources or books for studying hand anatomy and drawing techniques in more detail?
Several resources can help you study hand anatomy and drawing techniques in greater depth. Some popular books include “Drawing Hands & Feet” by Giovanni Civardi, “Figure Drawing for All It’s Worth” by Andrew Loomis, and “Dynamic Figure Drawing” by Burne Hogarth. Online resources like Proko and New Masters Academy also offer video tutorials and courses on hand drawing and anatomy. Finally, studying the work of accomplished artists can provide valuable inspiration and insights into successful hand drawing techniques.
What are some effective warm-up exercises I can do before starting my fist drawing practice sessions?
Before starting your fist drawing practice, warm-up exercises like quick gesture drawings, loose scribbling, or drawing simple shapes can help relax your hand and increase focus. You can also practice drawing basic hand shapes or sketching individual hand components (fingers, palm, etc.) to familiarize yourself with the anatomy and movement before diving into more complex fist drawings.
How long does it usually take to become proficient in drawing fists and hands?
The time it takes to become proficient in drawing fists and hands varies depending on factors like individual aptitude, the amount of dedicated practice, and the quality of learning resources used. Some artists may see improvement in a few weeks, while others may take several months or even years to become proficient. Consistent practice, studying hand anatomy, and learning from other artists will help speed up the process.
Are there any specific artists or styles I should study to improve my understanding of hand and fist drawing?
Studying the work of renowned artists known for their exceptional hand drawings can provide valuable insights and inspiration. Some artists to consider include Leonardo da Vinci, Michelangelo, Albrecht Dürer, and George Bridgman. Additionally, exploring different artistic styles, such as comic book art, classical realism, or animation, can help you develop a versatile understanding of hand and fist drawing techniques.
These questions can help address any remaining concerns or curiosities that readers may have, further enhancing the value of your article.
References
- Bridgman, G. B. (1973). Constructive anatomy (Vol. 501). Courier Corporation.
- Loomis, A. (2021). Figure drawing for all it’s worth. Clube de Autores.
- Proko. “How to Draw Hands – Tutorial, Tips, and Techniques.” Proko, 2021.







Leave a Reply